Posts

Link Check Open Source: url-fi
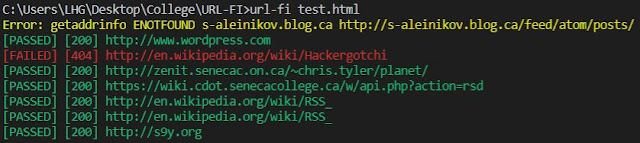
Image
Introduction Url-fi is a command-line tool written in NodeJS for finding and reporting dead links in a file. Users might use this tool to help locate broken URLs in any type of file (e.g., HTML, text file). This is the GitHub repository you can get my codes:  https://github.com/hyunjiLeeTech/URL-FI How to set up the tool Copy and paste the link into a terminal or visual studio code with the following command: git clone https://github.com/hyunjiLeeTech/URL-FI.git To start the tool, use the cd command to make sure you are in the correct folder and then install all the dependencies using the npm command: npm i Enter the command to start the tool. You need to mention the file name. Usage url-fi [argument(s)] [filename] Arguments -v: Running the tool with v argument prints the name of the tool and its version -s: Running the tool with the s argument checks both http:// https:// -h: Running the tool with the h argument prints the usage of this tool Features Colorized output. Good URLs sh...

Develop Url Checker Open Source Named Url-fi

This is a post to document my journey to create an URL checker command-line tool. There are various languages I can use to create this tool such as NodeJS, Go, and Java. I chose NodeJS as a language and worked on creating it under Unix. I created a GitHub public repository to push my codes so other people can review or test my tool. When I completed my tool, I asked to review and test my code on Slack. Mr. David Humphrey and Mr. Calvin Ho gave me some directions to improve my code. The following are the things they ask me to change Change all var variable type to let variable type. Also, if the value is not going to change, use const variable type Move the regex (data type: const) to the top If I need to check error with other conditions, check error early and then check others The async function is not needed I don't need to cover 'finding the error and exit the process' code into if statement because if I exit the process, it's already done It was really interesting t...

Introduction

  Hi, my name is Hyunji Lee and I am taking OSD600 (Open Source Development) course which is one of the professional options at Seneca, CPAC (Computer Programming and Analysis with Co-op) diploma program. Currently, I am located in Toronto. I do not go outside like before due to COVID-19. It is a little bit boring but I think it is a good chance to improve my developing skills in this situation. I have developed a variety of programming skills at college and am trying to improve my skills. Specifically, I have an interest in web development. This website named  BookEat  is the one I have created with my team a few months ago. We used a MERN (MongoDB, Express, React, and NodeJS) stack application with a platform named Heroku. We managed our codes using git and that was impressive. As I usually manage my codes of my personal project using git & GitHub, I thought I know how to use git. However, when I was using a git for the team project, it was totally different. I shou...

Project: Final

Introduction In this post, I will describe the summary of how I have done each stage. The purpose of this post is for wrapping up this project. The purpose of the project is the optimization of one open-source project. I need to compile, benchmark, profiling, and optimize the software. The detailed information about the project is described in the  SPO600 winter project .  Previous posts related to this project The previous posts for this project are listed below. You can read the detailed steps of how I have done each stage. Stage 1 Project Stage 1 - Compiling and Benchmark Butteraugli Stage 2 Project Stage 2 - Profiling Butteraugli Project Stage 2: Profiling (x86_64) The links for the results Project: Organize the Results Stage 3 Project Stage 3: Optimization Stage 1 Stage 1 is for building and benchmarking the performance of an open-source software package. There are some requirements for the open-source package I need to consider. Firstly, the time f...

Project Stage 3: Optimization

Image
Introduction This is a report for the project stage 3, optimization. Before you read this post, it is vital to read stage 1  (compile and benchmark) and stage 2 reports (profiling under Aarch64 and x86_64 architecture ) because those are the previous steps for this report. If the results images are not shown on the reports, this is the additional post for this blog which contains the links for each result. The Project I Selected: Butteraugli The Butteraugli is the project Google created. It estimates the psychovisual similarity of two images. The detailed information about this project is described on the  Google Opensource website about the Butteraugli . The source code for this project is located here:  GitHub - Butteraugli . Discover the Points of the Optimization In stage 2, the results of the profiling show that butteraugli::Convolution is the function that takes the most of the time for compiling. Also, the command perf discovers 'ldr' is the code th...

Project: Organize the Results

Introduction This blog is for organizing all the results I have done in Stage 1 and Stage 2 ( Aarch64 profiling and x86_64 profiling ). As I have found that the images I put on the blogs sometimes are not shown on the screen, I think this organization can be helpful for the readers to understand what the result of each stages. I put the links for each stage's results. Benchmark result Profiling result On the next blog, I will post what points I can optimize this project based on the profiling results.

Project Stage 2: Profiling (x86_64)

Image
Introduction As the profiling I have done on the previous blog was using Aarch64 architecture, I will do profiling in x86_64 architecture and describe the result. I recommend to take a look at the previous blogs related to this project: Project Stage 1 - Compining and Benchmarking Butteraugli and Project Stage 2 - Profiling Butteraugli The Project I Selected: Butteraugli The Butteraugli is the project Google created. It estimates the psychovisual similarity of two images. The detailed information about this project is described on the Google Opensource website about the Butteraugli . The source code for this project is located here: GitHub - Butteraugli . How to use gprof and perf The detailed process of how to use gprof and perf for Butteraugli profiling is described in the Project Stage 2 - Profiling Butteraugli .  Result of the prof in x86_64 architecture Image size: 5mb Image size: 10mb Result of the perf in x86_64 architecture Image size: 5mb Image siz...